We’ve been working our buns off on our little 18’ Go-Tag-A-Long Travel Trailer. The interior is becoming very comfortable and livable. It’s starting to feel like home. Randy is a great sport about how I choose to decorate the camper. His only two requests were that I DO NOT paint the paneling (I guess it adds to the 70’s ambience?) And also, he wanted it gender neutral…not ruffles or gingham. Here’s a little of what we’ve done.
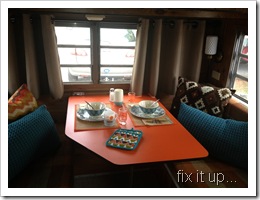
This view shows the new curtain on the large front window. (More on curtains later.) Also, this great orange laminate was discovered on the table underneath a filthy layer of “granite” contact paper. Earth tone cushions were embraced for their “70ish style”…cleaned and left original. Original sconces got a good scrubbing. Also, new carpet tiles.

The contact paper
shown on table above
before the exciting
discovery underneath.
My kitchen is still a work in progress. I ripped off the old wall covering and replaced it with “hammered copper” squares from Home Depot. Randy made the wood grid for my sink topper. It practically doubles my counter space…ha ha. I accessorized with fun IKEA stuff!
Note in the before shot, the counter top was also covered with the “granite” contact paper.


I was horrified at the cost of having to purchase four quilt sets for our bunks. Then I realized that I could purchase two full/double size quilt sets at a significant savings. Each came with two pillow shams. I split the quilts down the middle and finished off the cut edge. Then I put the cut edge up against the wall side of the bunk.


All the cabinet and closet doors were removed and taken down to my workshop. Each door was wiped clean. Then I used liquid scratch remover on the entire surface. It’s amazing how the scratches and gouges just disappeared. Then I repainted all of the edges of drawers and doors a medium brown. The old hardware was removed and replaced by knobs and pulls that have a slight southwestern feel and are edged in copper. I’m attempting to use the copper accents throughout the entire camper.

 Note the lovely blue carpet in the before shot above. The after picture gives a glimpse of the mocha colored carpet tiles. I’ve kept most of the permanent fixtures neutral colors, and I’m accessorizing with the fun, bright colors since they can be changed out at little cost and effort.

 Neither of the shots above are a very good quality, but I just wanted to illustrate the location of my new microwave. You will notice a cabinet directly below the fridge. I took the door off and had to cut the opening slightly larger. An electrical receptacle was installed inside the cabinet when we had the wiring updated after purchasing the trailer. So then I was able to slip the microwave into the new opening and secure with wood strips. Then I framed out the opening and reframed the fridge to blend the two together. They were painted the same brown as the cabinet door edges.
Next on my list is installing a “portable” air conditioner that will sit below the microwave. I will take out both the old furnace and the cabinet below the furnace. This will allow enough room for the air conditioner to roll into place. It vents through a five inch hose similar to that of a clothes dryer. That hose will attach to the existing furnace vent opening that goes to the outside.
A bathroom update is on the horizon also. More on that later!


